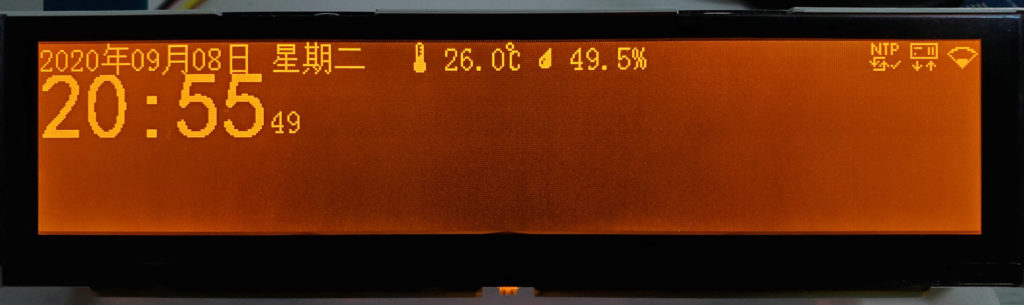
由于手里正好有几块480*96分辨率的大点阵LCD屏,就想着用ESP8266做一个可以显示日期时间以及天气等多种信息的桌面时钟,既然都使用了网络,不妨做一下网络对时,让这个时钟真正联网即可用,不用进入任何设置。
网络对时通常采用NTP协议,使用Arduino开发ESP8266时,只需要安装NTPClient库就可以进行对时,非常方便。
使用时先在程序开头引入头文件:
1 2 | #include <NTPClient.h> #include <WiFiUdp.h> |
然后创建实例:
1 2 | WiFiUDP ntpUDP; NTPClient timeClient(ntpUDP, "ntp1.aliyun.com",3600*8, 60*1000); |
注意在这个过程中,因为库自带的NTP服务器连接比较慢,这里使用了阿里的,另外由于国内时区为东八区,需要传入校准参数(+8小时*3600秒),后者为更新时间(单位ms),在更新时间内调用update则不触发NTP通信。
具体使用时,首先在setup函数调用:
1 | timeClient.begin(); |
然后只要在主循环中根据需要调用:
1 | timeClient.update(); |
就可以联网同步时间了,当然前提是你已经成功连接了互联网。这个函数返回1则代表同步成功,但此时你的代码还不能获取到时间值。
要获取同步过来的时间,库中提供了多种函数:
1 2 3 4 5 6 | timeClient.getEpochTime(); //获取Unix时间戳,NTP返回的原始数据,为1970年1月1日0:00到现在的秒数 timeClient.getDay(); //换算星期 timeClient.getHours(); //换算小时 timeClient.getMinutes(); //换算分钟 timeClient.getSeconds(); //换算秒 timeClient.getFormattedTime(); //输出"hh:mm:ss"格式的字符串形式时间 |
可以看到库中只提供了一些简单的换算,如果想要得到具体的年月日,则需要额外写一部分代码直接对返回的Unix时间戳进行换算。以下是经过试验成功的代码:
(感谢算法提供https://www.cnblogs.com/chorm590/p/10901265.html)
1 2 3 4 5 6 7 8 9 10 11 12 13 14 15 16 17 18 19 20 21 22 23 24 25 26 27 28 29 30 31 32 33 34 35 36 37 38 39 40 41 42 43 44 45 46 47 48 49 50 51 52 53 54 55 56 57 58 59 60 61 62 63 64 65 66 67 68 69 70 71 72 73 74 75 76 77 78 79 80 81 82 83 | unsigned char Leap_Year_Judge(unsigned short year) { //判断该年是不是闰年 if ((year % 400) == 0) { return 1; } else if ((year % 100) == 0) { return 0; } else if ((year % 4) == 0) { return 1; } else { return 0; } } unsigned char last_day_of_mon(unsigned char month, unsigned short year) { //判断每月天数并在闰年时给2月+1天 const unsigned char day_per_mon[12] = { 31, 28, 31, 30, 31, 30, 31, 31, 30, 31, 30, 31 }; //每个月的天数 if ((month == 0) || (month > 12)) { return day_per_mon[1] + Leap_Year_Judge(year); } if (month != 2) { return day_per_mon[month - 1]; //非2月直接返回对应月份天数 } else { return day_per_mon[1] + Leap_Year_Judge(year); //2月则判断该年是不是闰年 } } void RTC_Sync(void) { //计算时间数据并同步写入时钟芯片 unsigned long Unix_Time; unsigned int year; unsigned char month, day, week, hour, min, sec; int year_tmp, month_tmp, day_tmp; unsigned char RTC_Buff[7]; //时钟芯片数据缓存 Unix_Time = timeClient.getEpochTime(); //获取当前Unix时间戳 int days = Unix_Time / 86400L; //算出1970-1-1至今天数 for (year_tmp = 1970; days > 0; year_tmp++) { //从1970开始减每年天数同时年份+1 day_tmp = (365 + Leap_Year_Judge(year_tmp)); //这一年有多少天 if (days >= day_tmp) {//条件成立,则year_tmp即是这个时间戳值所代表的年数。days剩下的数即为今年过了多少天。 days -= day_tmp; } else { break; } } year = year_tmp - 2000; //减去2000是因为时钟芯片仅接受2位数年份 for (month_tmp = 1; month_tmp < 12; month_tmp++) { //计算今年过了几个月,方法同上 day_tmp = last_day_of_mon(month_tmp, year); //获取每个月的天数 if (days >= day_tmp) {//条件成立,则month_tmp即是这个时间戳值所代表的月数。days剩下的数即为这个月过了多少天,即日。 days -= day_tmp; } else { break; } } month = month_tmp; day = days + 1; week = ((Unix_Time / 86400L) + 4) % 7; //计算星期,0代表星期天 hour = (Unix_Time % 86400L) / 3600; //计算小时 min = (Unix_Time % 3600) / 60; //计算分钟 Unix_Time = timeClient.getEpochTime(); //重新获取一次Unix时间戳以免上述处理过程耗时影响精度 sec = Unix_Time % 60; //计算秒 RTC_Buff[0] = ((sec / 10) << 4) | sec % 10; //将以上数据换算成时钟芯片可以接受的格式写入缓存 RTC_Buff[1] = ((min / 10) << 4) | min % 10; RTC_Buff[2] = ((hour / 10) << 4) | hour % 10; RTC_Buff[3] = 0x01 << week; RTC_Buff[4] = ((day / 10) << 4) | day % 10; RTC_Buff[5] = ((month / 10) << 4) | month % 10; RTC_Buff[6] = ((year / 10) << 4) | year % 10; Write_R8025(RTC_Buff); //将缓存写入时钟芯片,校时完成 } |